Free 1GB eSIM inside app


How To Transfer eSIM: A Guide With Troubleshooting Tips
September 11, 2025

Switching phones? No problem.
eSIMs make it easier to manage mobile plans, but moving one to a new device isn’t always automatic. The steps vary depending on the phone, the operating system, and the carrier.
This guide explains how to transfer eSIM, with easy-to-follow instructions. You’ll find steps for both iPhone and Android, what to expect when switching between platforms, when to use Bluetooth or QR code setup, and how to fix common issues like failed activations or missing profiles.
Understanding eSIM Transfers: What You Need To Know
An eSIM is a built-in digital SIM that replaces your device's need for a physical SIM card. Unlike physical SIMs, you can’t remove and reinsert an eSIM when switching phones.
Some eSIMs are locked to the original device, and you may require help from your carrier to activate a new one. This guide focuses on what you can do on your own, but keep in mind that some steps depend on your carrier’s support.
Can You Transfer Your eSIM? Key Factors To Check First
Before you go through the eSIM transfer process, ensure your phone and carrier actually support it. eSIMs are digital, but that doesn’t mean they’re universally flexible.
Compatibility and carrier policy significantly affect how smoothly the transfer will go.
Check Device Compatibility
Not every phone handles eSIM the same way. For example, if you’re using an iPhone 14 or newer in the U.S., you’re working with an eSIM-only device.
Because Apple builds eSIM functionality directly into its setup process, transferring eSIM between iPhones is usually more seamless than on other platforms.
As more manufacturers adopt an eSIM-only model, virtual SIM adoption will only accelerate. It’s already happening. In fact, eSIM usage doubled in countries like North America, Asia, and Western Europe. (Source: Trusted Connectivity Alliance)
On an Android device, the experience depends on your device or software. Many Samsung and Google Pixel phones support eSIM, but the following things are required. Make sure your phone is running the right OS version (Android 12 or later) and that your carrier allows eSIM activation on your specific phone model.
Carrier Support Matters
Even if your phone supports eSIM, your carrier might restrict how you can use it. Some carriers lock your eSIM profile to one device, so you’ll need to request a new activation code before switching.
Depending on the carrier, you can also do a self-service transfer through an app or website.
Maaltalk offers a different kind of flexibility, right at the plan level. Our eSIM plans are ideal for travelers wanting reliable, contract-free coverage in specific countries, regions, or across multiple destinations.
Instead of dealing with roaming charges or limited network access, you can choose the right plan that fits your trip and activate it when you’re ready.
Backup First
Before making any changes, back up your phone. This will protect your data if anything goes wrong during the transfer.
Methods To Transfer Your eSIM
There’s more than one way to move your eSIM to a new device. The method you’ll use depends on your phone, your carrier, and how you set it up initially.
Here are the main methods and when to use each one.
Method 1: Bluetooth eSIM Transfer (Quick Transfer for iPhones)
For iPhones with iOS 16 or later, you can transfer an eSIM via Bluetooth during setup or through Settings > Cellular > Add eSIM.
You’ll see two options: Set up eSIM from another phone or through a QR code.
Method 2: QR Code Activation (Cross-Platform and Manual Setup)
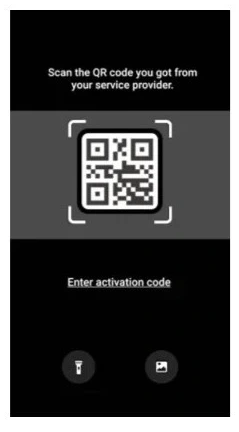
Request a QR code from your carrier and scan it on your new phone. This method works across Android and iPhone. It’s also effective when switching between platforms.
Method 3: Carrier App or Manual Provisioning
Experts predict that the number of travel eSIMs will grow from 40 million in 2024 to over 215 million by 2028. (Source: Juniper Research)
Because so many people are using eSIMs and will learn how to transfer eSIMs in the future, carriers are making the process more seamless.
For example, some support eSIM setup through their official apps or allow manual activation using a code.
Maaltalk focuses on convenience and flexibility, but tailors the experience specifically for travelers. The MaaltalkNow App makes setting up a new eSIM easy and allows you to activate your cellular plan with just a few taps. The app includes AI Product Recommendations that consider your destination, travel duration, and data needs to make plan selection even easier.
And as a bonus, when you purchase an eSIM through the app, you get a 10% discount. Win-win!

Method 4: Contacting Your Carrier for Reactivation
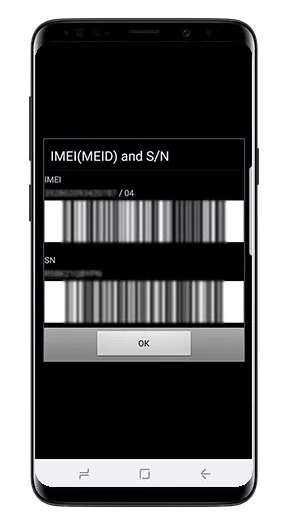
If your carrier doesn’t support self-service, you may need to contact them to reactivate your service. Be ready to share your phone’s IMEI and EID numbers.
The IMEI stands for International Mobile Equipment Identity. It’s a unique number that identifies your phone. Carriers use it to register your device on their network.
Another unique number is the Embedded Identity Document (EID). It directly ties to your phone’s eSIM chip and helps the carrier activate and manage your eSIM.
Both numbers are in your phone’s settings. On iPhone, go to Settings > General > About. Scroll down to find both the IMEI and EID.
On Android, go to Settings > About phone or Settings > System > About phone. You can also dial *#06#, and the IMEI will appear on your screen (as shown below).
Step-By-Step Guide: How To Transfer eSIM to a New iPhone
Apple makes it easy to move your eSIM from one iPhone to another if both phones are nearby and using iOS 16 or later.
- Turn on your new iPhone and start the setup.
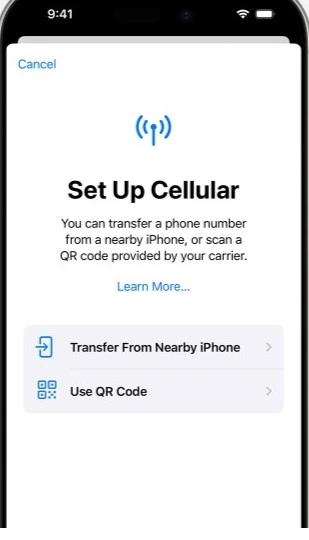
Follow the on-screen instructions until you reach the Set Up Cellular screen.
- Choose Transfer from Nearby iPhone.
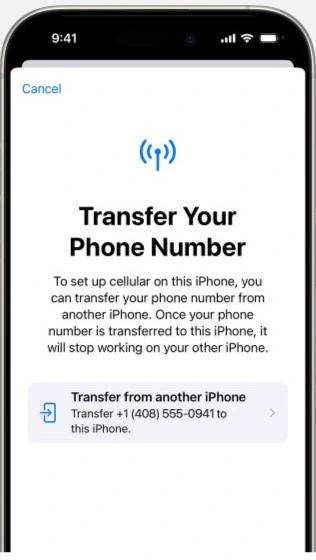
When you reach the cellular setup step, your new iPhone will automatically search for your old iPhone. Keep both phones near each other and unlocked. Your new iPhone will allow you to transfer the eSIM from the nearby device.
- Tap Transfer on your old iPhone. A message on your old phone will ask if you want to move the eSIM to the new device. Tap Transfer and follow the instructions.
- Finish the setup and test your service. After the transfer is complete, finish setting up your new iPhone. Then, test your mobile connection by making a call or using mobile data.
Step-By-Step Guide: How To Transfer eSIM to a New Android Device
Each Android brand handles eSIM transfers a bit differently. However, these steps work for Samsung Galaxy phones (the most popular Android brand with 20% of the market share, according to Counterpoint Research).
You’ll usually need a new QR code from your mobile carrier to activate the unlimited eSIM plan on your new device.
Steps for an Instant eSIM Transfer Between Samsung Galaxy Phones
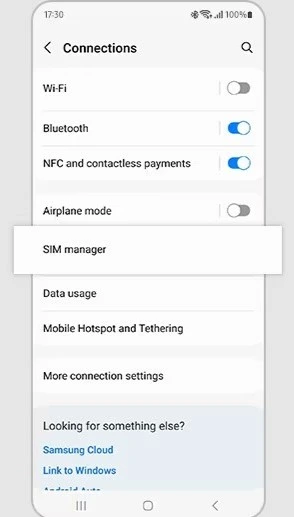
- On your new device, go to Settings > Connections > SIM manager > Add eSIM.
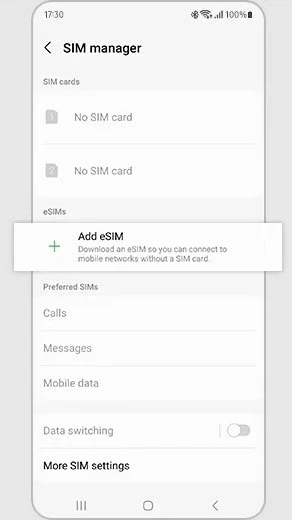
- Tap Transfer SIM from another device.
- Your old device will show a pop-up for SIM transfer. Tap Transfer.
- Enter the 6-digit verification code from your new device into your old device.
- On your new device, select a phone number from the list provided by your old device and tap Transfer.
- Tap Transfer on your old device.
- When the transfer is complete, tap Done on your old device.
Always confirm the transfer worked with a test by making a call and using your mobile data.
Transferring eSIM From Android to iPhone (And Vice Versa)
Switching between Android and iPhone may not be exactly the same process, but it shouldn’t be any more complex than transferring an eSIM between identical platforms. Just keep the following things in mind.
- 1.Acquire a new QR code or activation code for your eSIM.
Contact your mobile provider and tell them you’re switching from Android to iPhone (or vice versa). They’ll generate a new eSIM code for your new phone and send it via email or their app.
- 2.Scan and activate the eSIM on your new phone.
Go to the cellular or network settings on your new device and choose Add eSIM or Use QR Code. Then, scan the new code your carrier gave you (or enter the details manually) and follow the on-screen steps to activate.
- 3.Test the connection.
Once the eSIM is active, try making a call or using mobile data to make sure it works.
Important Points To Consider Before Transferring Your eSIM
Before you begin the transfer, take a moment to check a few details. These simple steps can help you avoid common issues and make the process go more smoothly.
Ensure Devices Are Unlocked
Check that both your old and new phones are unlocked. If either phone is locked to a specific carrier, you won’t be able to activate an eSIM from a different provider.
Don’t Delete Your Old eSIM Until the New One Works
Wait until the new eSIM connects and works properly before removing the old one. If you delete it too soon, you could lose service while setting up the new profile.
Have Your Carrier Contact Info Ready
Save your carrier’s phone number or chat link if you encounter problems. If something goes wrong, you’ll need to contact them quickly to request a new QR code or complete activation.
Troubleshooting eSIM Transfers

If your eSIM transfer isn’t working as expected, don’t worry. Most problems have simple solutions. Here are some common issues and how to handle them.
eSIM Transfer Option Not Available
Don’t see the option to transfer your eSIM during setup? Ensure both phones are running the latest software. Also, check that your carrier supports eSIM transfers and that you connect your phone to Wi-Fi.
Restarting both devices can also help trigger the transfer prompt.
Activation Fails or Is Stuck
If the activation doesn’t complete or seems frozen, first double-check that the QR code you’re using hasn’t expired. Then, connect your phone to a strong Wi-Fi network.
A quick restart can resolve any temporary glitches.
Carrier Lock Blocks Transfer
Sometimes, a phone that’s locked to a specific carrier won’t allow the eSIM to activate. In this case, please contact your carrier and request that they unlock your phone or reprovision your eSIM.
When they reprovision it, they reset the eSIM profile in their system and give you a new activation code or QR code so you can install it on your new phone.
Profile Not Found After Transfer
Is the eSIM still not showing up on your new phone after transferring? If so, you may need to set it up manually.
Go to your phone’s SIM settings and choose to add an eSIM.
You’ll have to enter an activation code from your carrier.
If that doesn’t work, contact your carrier for help. They can guide you through the process or send a new QR code.
How To Transfer eSIM With Confidence
Knowing how to transfer eSIM makes it much easier to switch phones without losing your number or mobile service.
iPhones and Android phones follow different steps, but the process is straightforward once you understand what your carrier requires.
Keep your phones updated, have your activation details ready, and contact your provider if you experience issues.
Ready for a hassle-free switch? Explore Maaltalk’s flexible local or regional eSIM plans for your next transfer.

FAQs About eSIM Transfers
The following are some more of the most common questions about eSIM transfers that we haven’t already answered in this post.
Can I Use eSIM and Physical SIM After Transfer?
Yes, if your phone supports dual SIM, you can use both an eSIM and a physical SIM simultaneously.
Do I Need a New Plan To Transfer eSIM?
No, you don’t need a new plan. When you transfer your eSIM to a new phone, your existing plan should move with it. Make sure your carrier supports eSIM transfers and your new phone is eSIM compatible.
Can I Transfer an eSIM More Than Once?
Yes, you can transfer your eSIM more than once, but the process depends on your carrier. Some allow you to do it through their app or website, while others may require contacting customer support.
Does Transferring My eSIM Change My Number?
No, your number stays the same. Transferring an eSIM is just like moving your SIM card to a new phone.
Is There a Fee To Transfer eSIM?
Sometimes. Depending on the carrier, you may have to pay a transfer fee. If you’re considering switching, check with your carrier about potential costs. If there are, the fee will likely be less than $20.